Congratulations on the purchase of your BCS8+
Simple on the outside, complex on the inside.

What’s on the outside
There is a lot of secret sauce on the inside but let’s take a look on the outside
Display Matrix
Album Rest
Control Button (may be on top on some models)
Power Button
USB-C Power Slot
Barcode Scanner (may be on bottom on some models)
Wall Mounts
BCS8+ Set-Up in just 2 steps
From any mobile phone, tablet, PC, Mac;
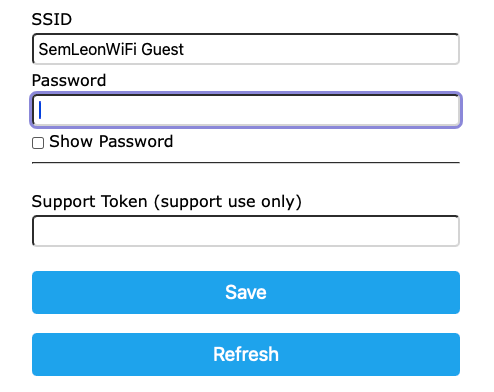
Go to your wi-fi wireless settings and look for the “TRaCK-BCS8” WiFi Network.
Select it to join.
A WiFiManager popup will display. Select “Configure Wifi”.
Select the WiFi Network you’d like to connect your BCS8 to.
Enter the password in the “password” field.
Click “Save”
If you were successful, your BCS8 should display “Connected!” for 5 seconds followed by “Welcome — Scan barcode to begin”, your system is ready to go!
Connect to Power using a USB-C cable and 5v Adapter. The power button interior circumference should illuminate blue. Press the button so that it clicks and remains in. (The display matrix may or may not illuminate)
Step1: Power Up
Step 2: Connect to WiFi

To scan a barcode, hold the bar code about 1-2 inches from the side. Using the red laser for alignment can be useful until you get used to the position, at which time, you can use the environmental barcodes later in this manual to disable it. The scanner is tilted slightly forward so that the angle is more outward (toward you) rather than inward (toward the wall).
The system will generally finish scrolling the current message, before changing to the newly scanned barcode so give the system a second to finish scrolling the current message after your scan to validate a good scan.
If you are configuring your device using the tone codes or environment codes using your mobile phone, make sure the barcode positioned near the bottom or top of the screen for the easiest angle for the barcode scanner to read.
Scanning barcodes
Troubleshooting
Nothing is showing on the display matrix (screen)
Make sure that it is fully plugged in. The power button should have a blue illumination around the internal edge.
Make sure the power button is pressed in. There are two positions, on and off. When on, the button should be nearly flush with the outer ring.
If that all looks good, try to reconnect WiFi. Press the control button on the bottom of the device eight (8) times in rapid succession and follow the “connect to Wifi” process.
After scanning an album barcode, I see strange characters scrolling.
This could be one of two things.
Sometimes, the album title or artist name, may have characters that can not be translated correctly. This can create some strange looking text.
Try to scan it again. If your getting the same thing, scan a different album. If that’s successful then try the original album again. If this doesn’t fix the issue: Try to power off your unit, wait 5 seconds, and power back on. After you get the scrolling “Welcome—-” message, scan your barcode again.
If your still having the issue, send us an email and give us the barcode number and album name. We can investigate if it’s just a database issue, or something greater. Chances are that’s just how the title is stored in the public database, but let us know anyway. We might be able to get it edited.
Sometimes, during the transmission back to your unit, if there is any flutter or other interruption, the decoding of the information my have gotten scrambled. Simply rescanning the barcode or power cycling your unit can resolve/restore a good connection.
Nothing happens when I try to scan the barcode
If the power is on, and you are seeing the Welcome message scrolling, chances are your not placing the barcode in the necessary position. Typically the barcode needs to be about 1-2 inches from the scanner.
Ensuring the red laser is enabled is a good way to determine where you need to place the barcode for a good scan so make sure that is on (see environmental light codes section if not). The red laser should fully span the length of the barcode but not any farther.
Also, make sure “beep on good scan” is active until you get the hang of it. (See Tones codes) This is an audio tone that generates upon a successful code scan. Once you learn where you need to place the barcode, you can disable the red laser and/or the beep on good signal tone if you’d like.
If you still aren’t getting a scan, it might be too dark in your room. Activate the supplemental white light that is motion activated to help illuminate the barcode for a good scan. (See environmental light codes)
If all of those settings are turned on and you can’t get it to ‘beep’, get any new album information to display or you have heard the good scan beep but nothing is displaying or the message isn’t changing, try to power cycle the unit (off for 5 seconds then back on). If after a good scan you still do not see any album information, please contact support.
I’ve moved or I have (or need to) change my WiFi Network
This fix is a snap!
Just press the control button on your BCS8+ eight (8) times in quick succession to set it back to the WiFi discovery mode. You can then follow the Connect to Wifi setup instructions to re-connect to a different WiFi.
Make it your own.
Using the control button, or scanning ‘configuration’ barcodes; make your BCS8+ just right!
-

Speed
By default, your BCS8 scrolls from right to left at a moderate speed to allow a natural English reading direction; left to right. You can however change the scrolling speed if you find it too fast or slow. By default your speed setting is set to 3. To change it, use the control button on the bottom of your BCS8. Press it the number of times matching your preferred speed. (note you must press the button faster than 2 seconds apart)
1 = Very Fast
2 = Swift
3 = Standard (default)
4 = Slow -

Tones/Sounds
By default, your BCS8 will generate a tone after each successful scan. You can enable and disable this tone and choose from one of three tone frequencies by scanning the appropriate barcode. Feel free to print these out for easy access, or just bookmark the page for quick access from your mobile phone.
-

Light/Illumination
By default, your BCS8 will detect when the environment around it changes so that it is not continually scanning. It can trigger a white light so that the barcodes will be brightly illuminated and can be easily read in dark environments. This isn’t always necessary in all environments and can be disabled. You can also enable/disable the red aiming laser. Neither of which are required to be visible for the BCS8 to operate effectively. To configure, scan the appropriate barcode. Feel free to print these out for easy access, or just bookmark the page for quick access from your mobile phone.
My album doesn’t have a bar code, Now what?
While impossible to believe in this day and age, it is in fact possible because barcodes did not start appearing on albums until the late 1970’s.
Your best option is to create one. Chances are your album does have a barcode now that everything demands one, we just have to figure out what it is. The easiest and quickest way is to open Google http://google.com
Enter the following phrase replacing the album and artist name with what you are looking for: What is the barcode for the vinyl album Anthology of Bread, by Bread?
Usually Google AI, will display this information right at the top of the AI response window;

If not, keep searching. There are a lot of online record sales and sites that will have it. The most reliable is DISCOGS ADVANCED SEARCH: https://www.discogs.com/search/advanced
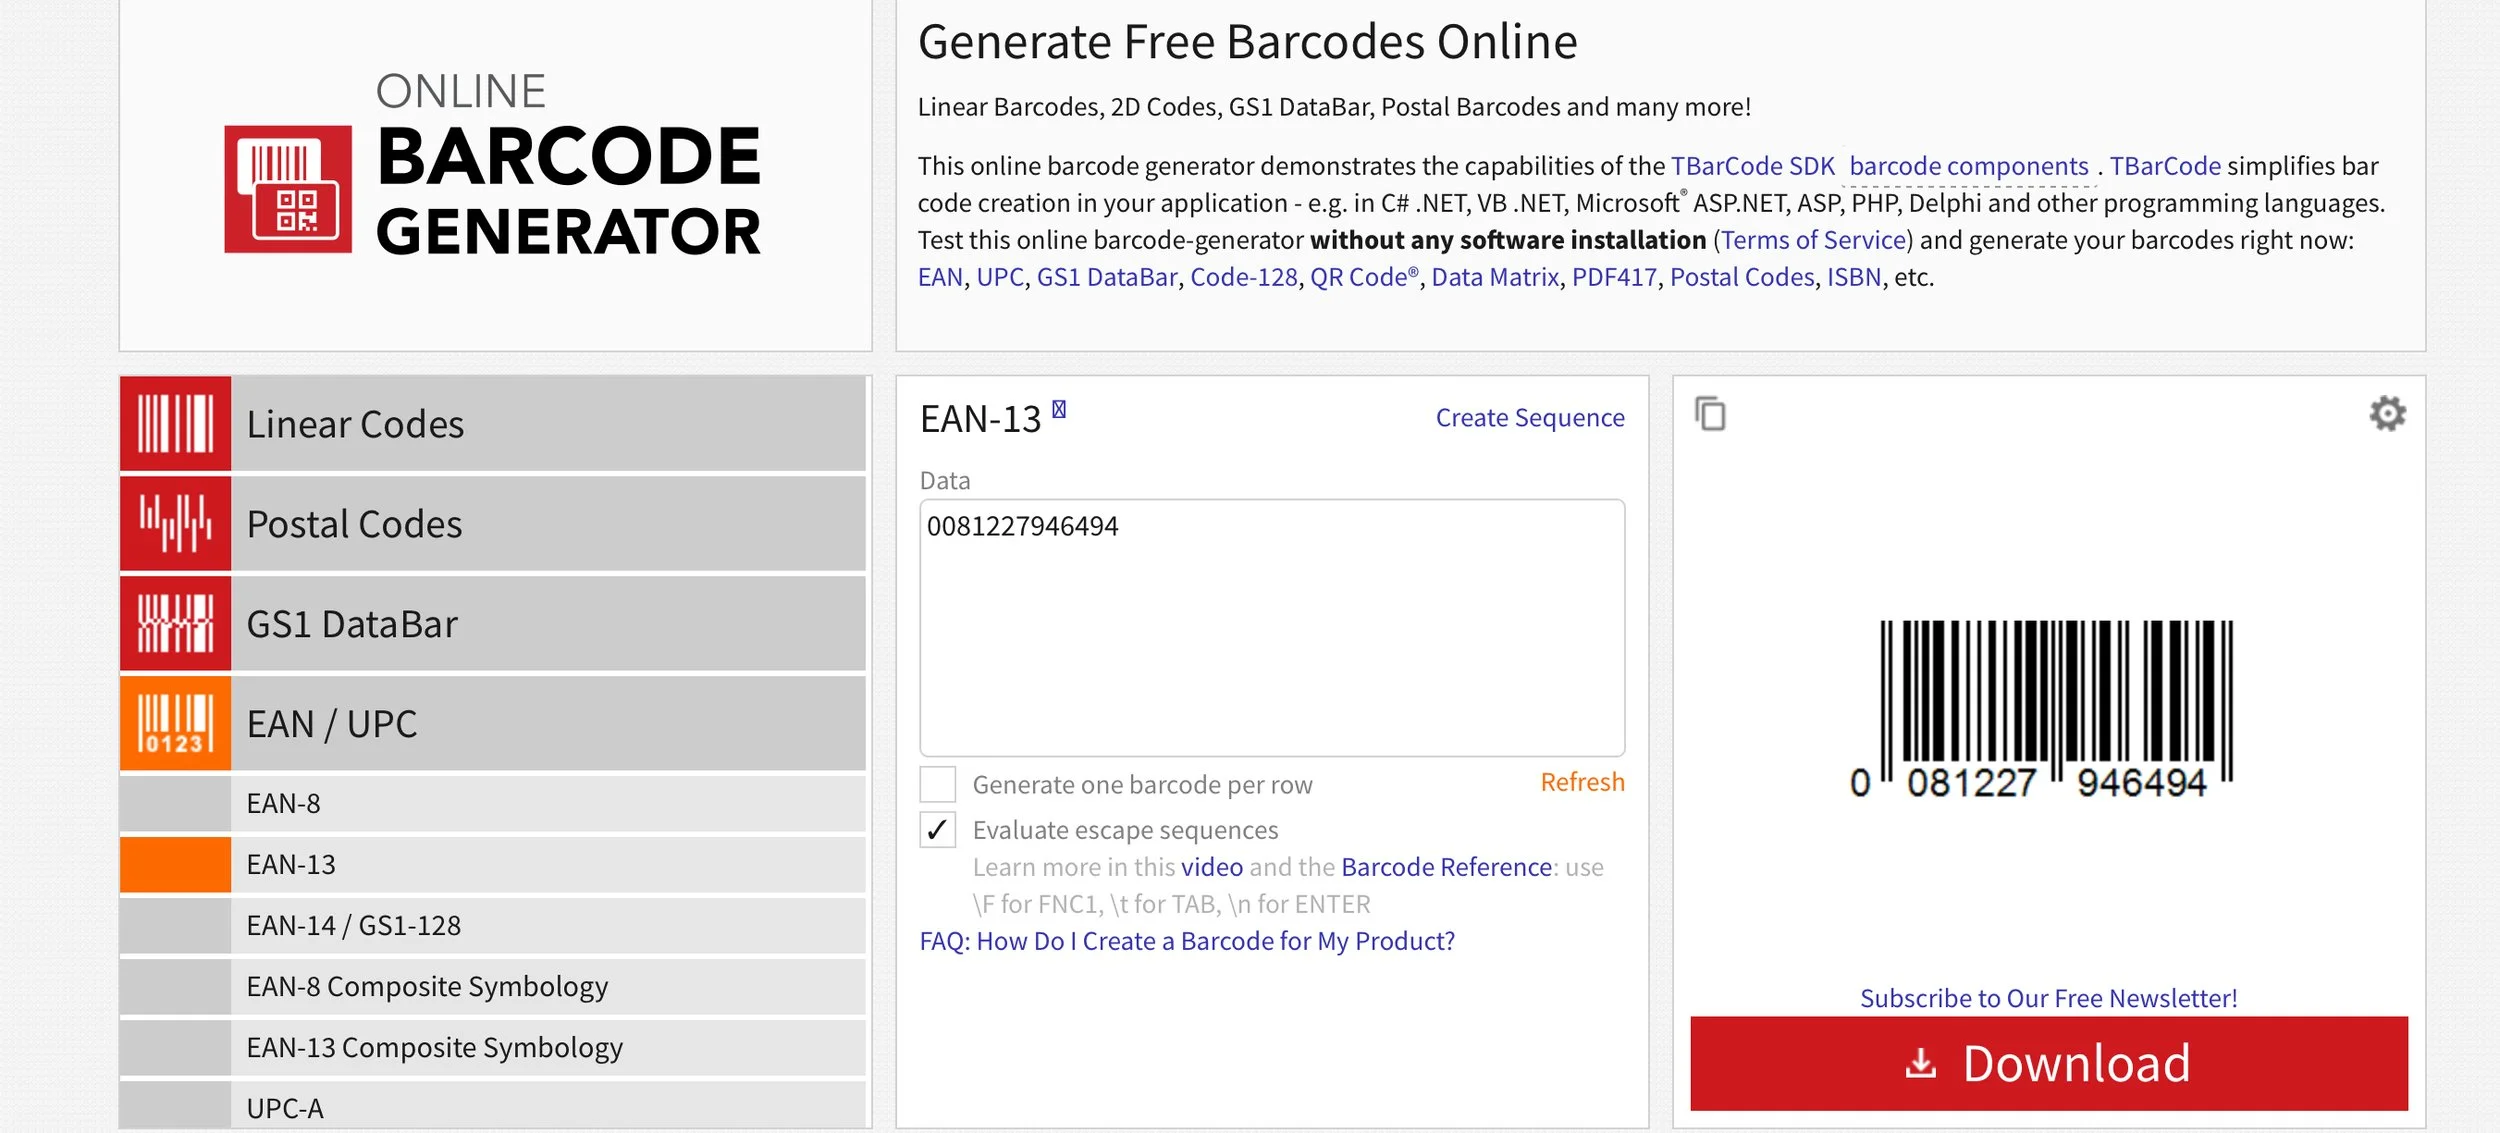
Now you need to generate a barcode if you can’t find an image of it. There are a lot of free online barcode generator tools to do that as well.
A good example we found was: https://barcode.tec-it.com/
Once on that site, select EAN/UPC as the barcode type from the list of barcode types on the left
Select EAN 13
Paste your barcode number in to the “data” field and click ‘refresh’ under that box.
Download/screenprint your barcode and print it on to a label or card.
Place the card or label in/on your album.